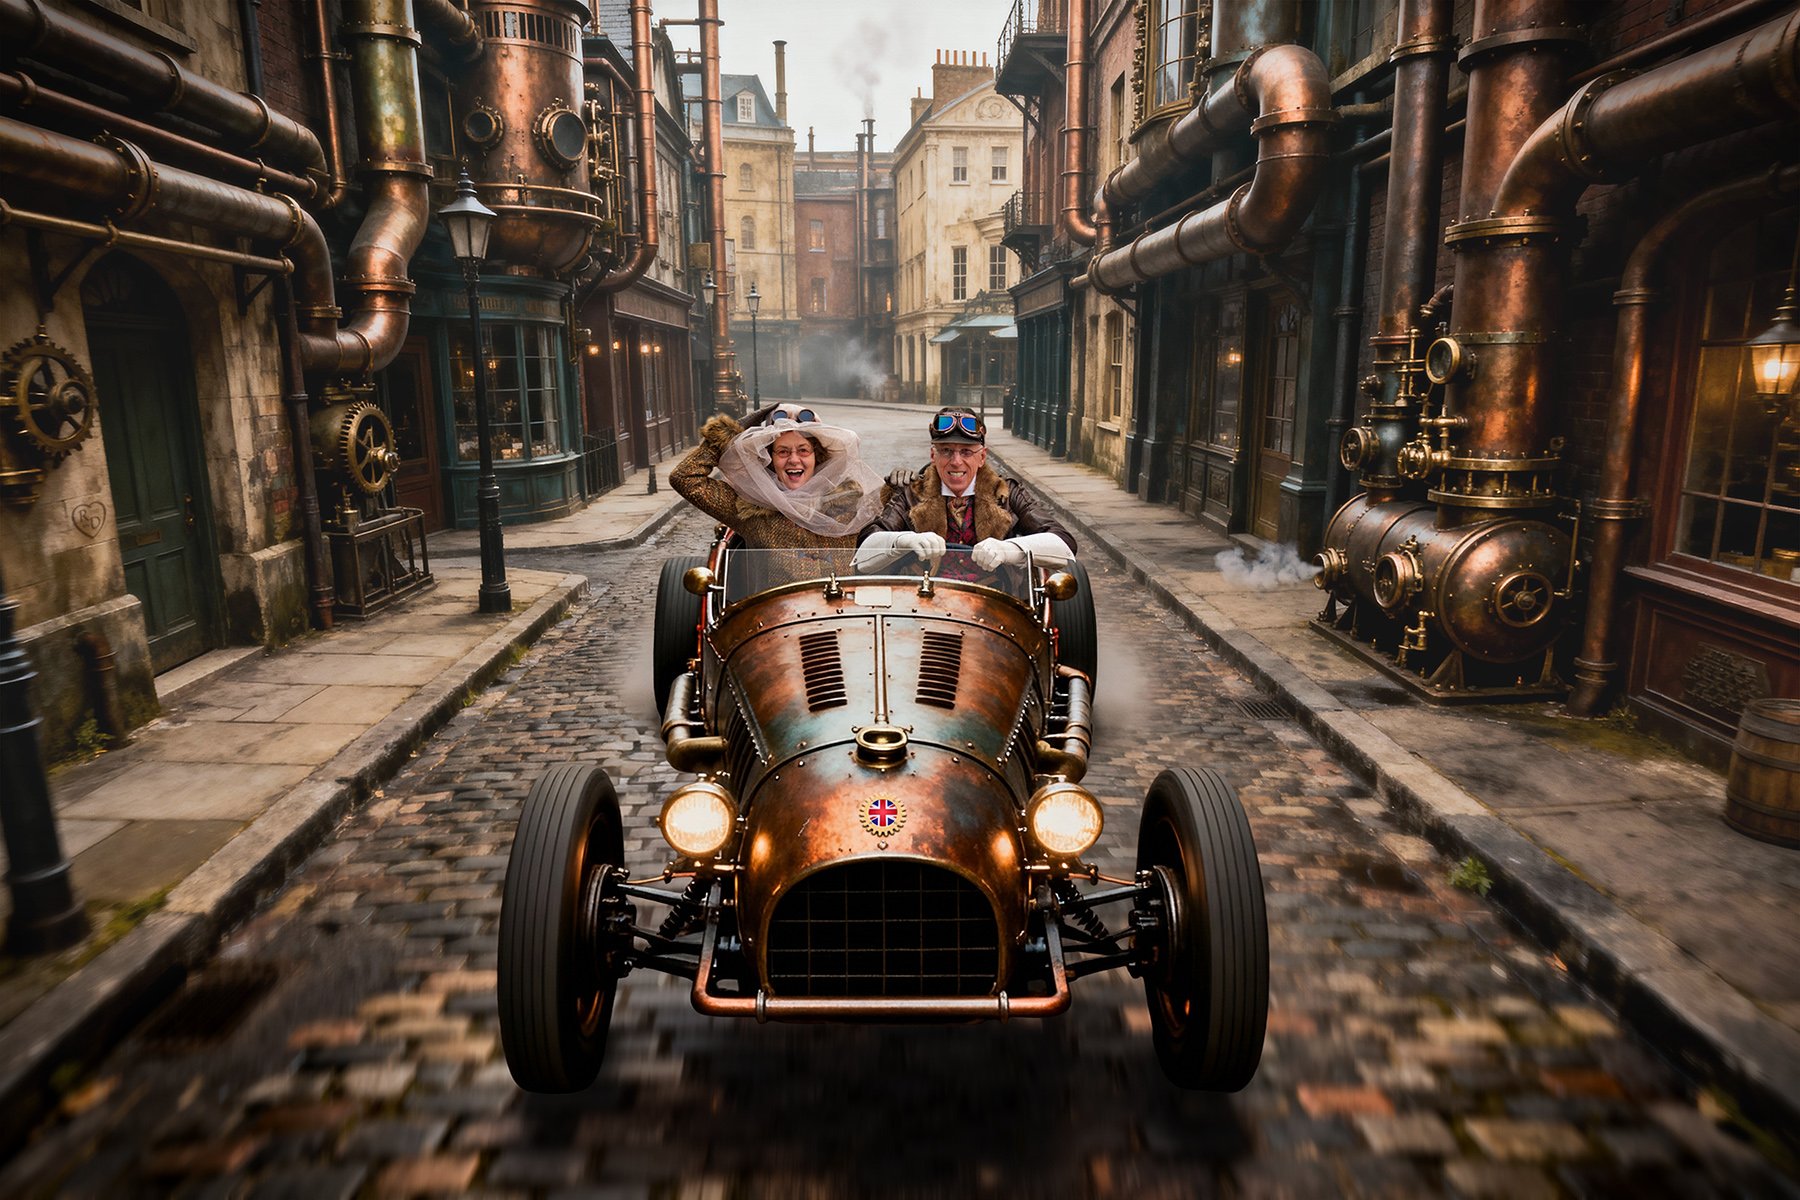
How Steampunk Composite AI Art is Created – by Roy Sinclair
Images created by artificial intelligence (AI) software seem to have suffocated the web in recent years, especially scenes of imagined steampunk alternative realities. Such works have never been properly realistic enough to pass as real photographs though ... until recently. Just as 2025 was getting ready to leave the room, two game-changing new AI engines brought AI image rendering firmly into the realms of photorealism: Seedream 4.5 and Nano Banana Pro. Emerging AI tools like these allow us to combine their fantasy images with digital photos of real people in order to create realistic (albeit heavily stylised in this case) composite images such as the one below. Allow me to explain the creative and technical processes involved in creating this particular artwork.
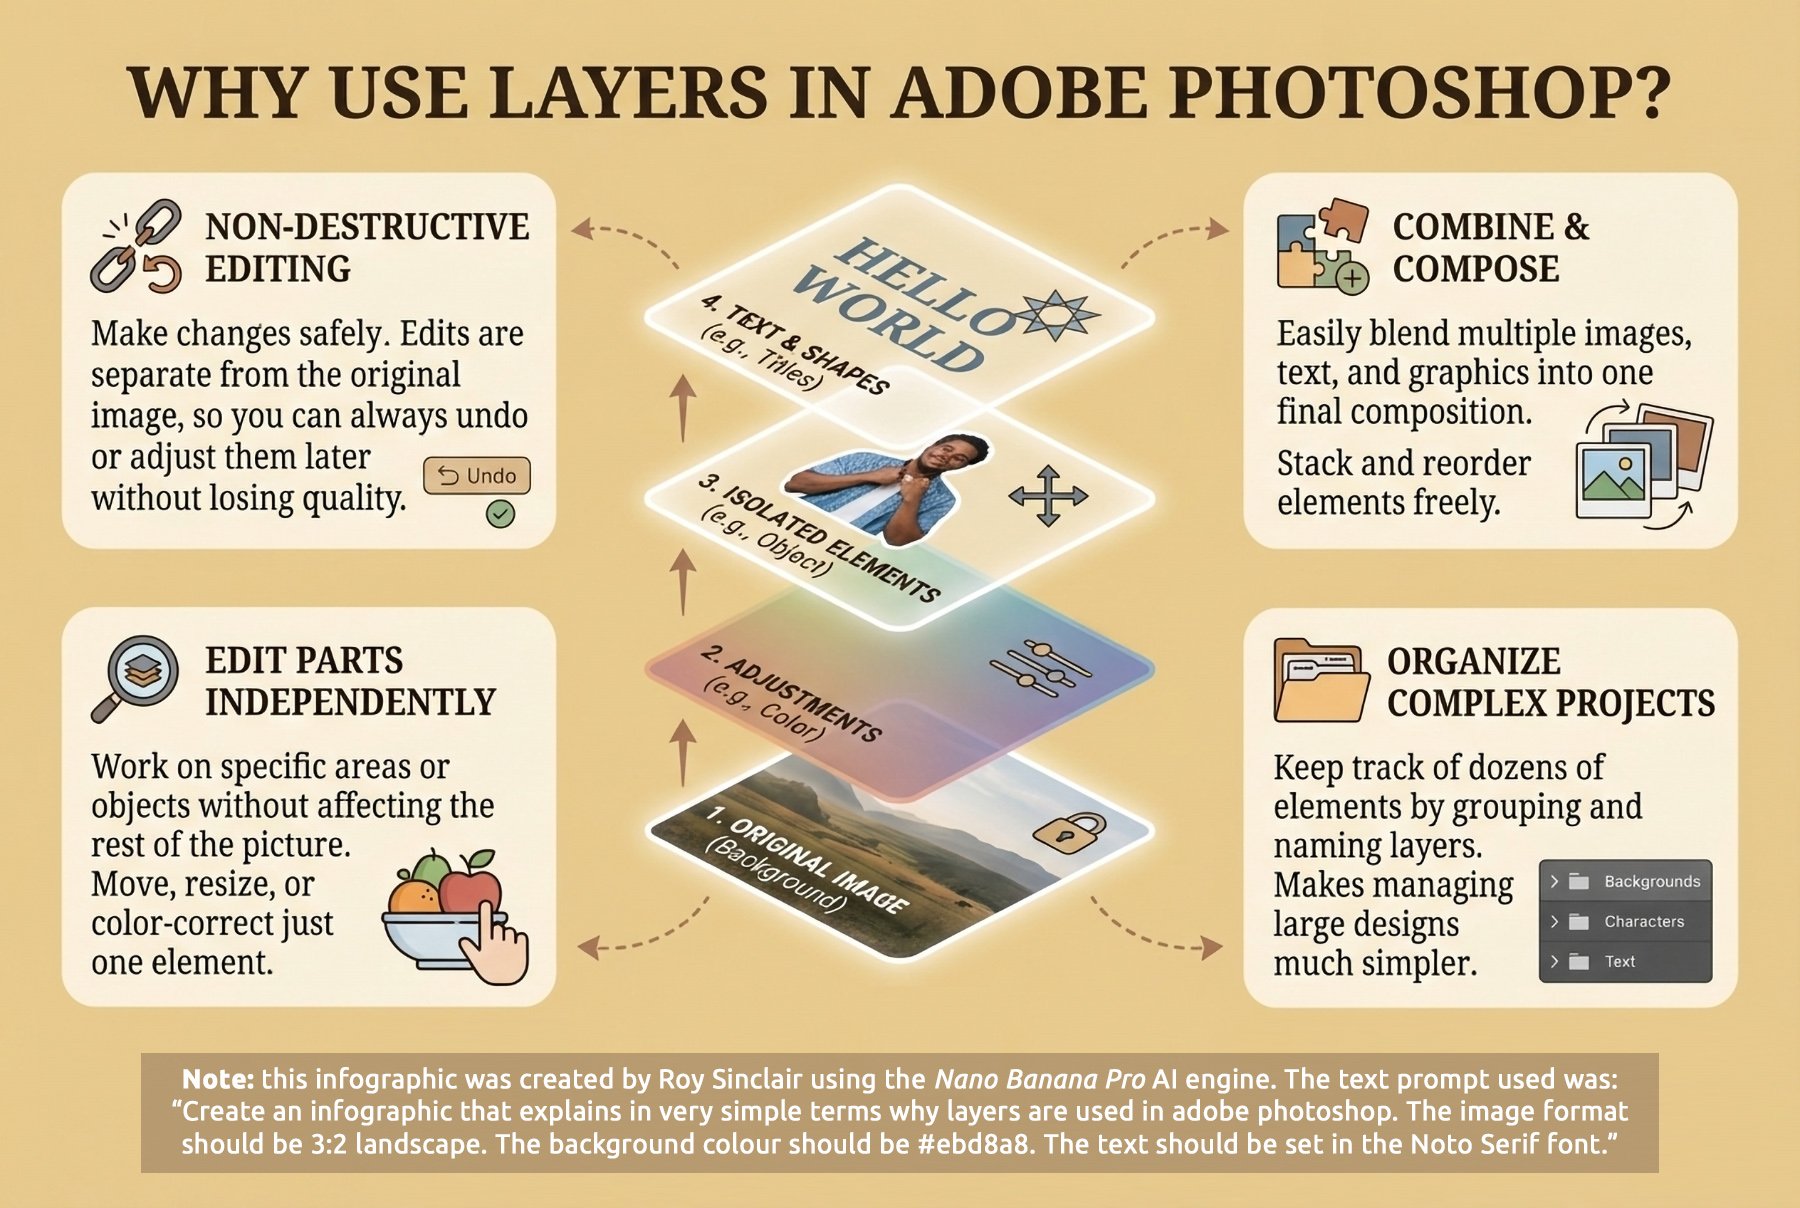
The secret to creating composite digital images of any kind is an understanding of digital art techniques, and tools such as Adobe Photoshop which allow us to edit and manipulate digital images in layers. The infographic on the right explains the basics, but in a nutshell, layers allow us to build up an image of multiple parts, each of which overlays the others beneath it. This way we can combine different image elements and edit them individually as the overall picture is built up.
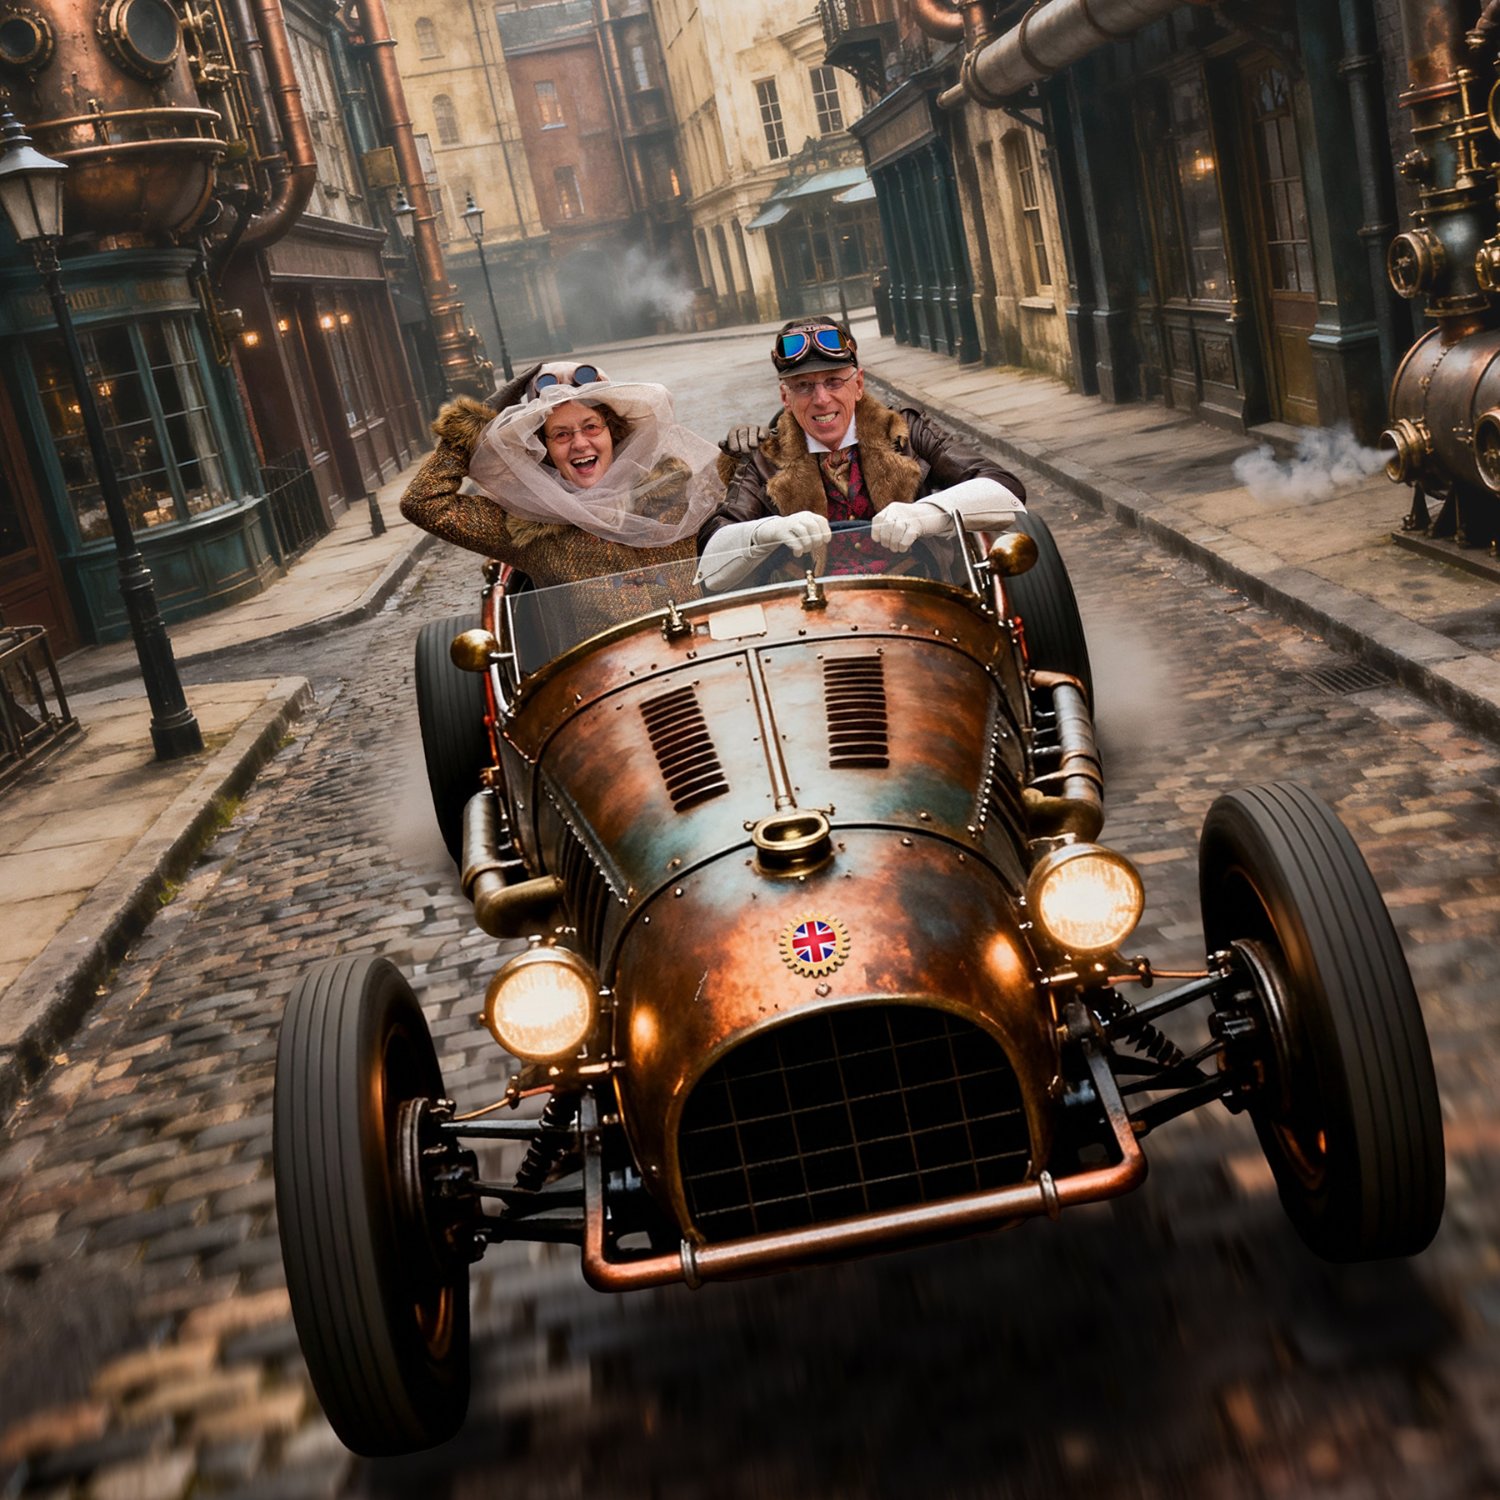
1 As with most creative art projects, the process begins with the artist visualising their desired artistic outcome, either in their mind's eye or as a pencil sketch. Sometimes the artist will start with a standalone photograph of the subject and build an imaginary background scene to suit it, as per the many examples shown on the right (or far below if you are using a phone), or as with this particular project, the entire image can be envisioned first, then created from scratch with the photograph of the subject being taken to suit the background once it has been finalised.
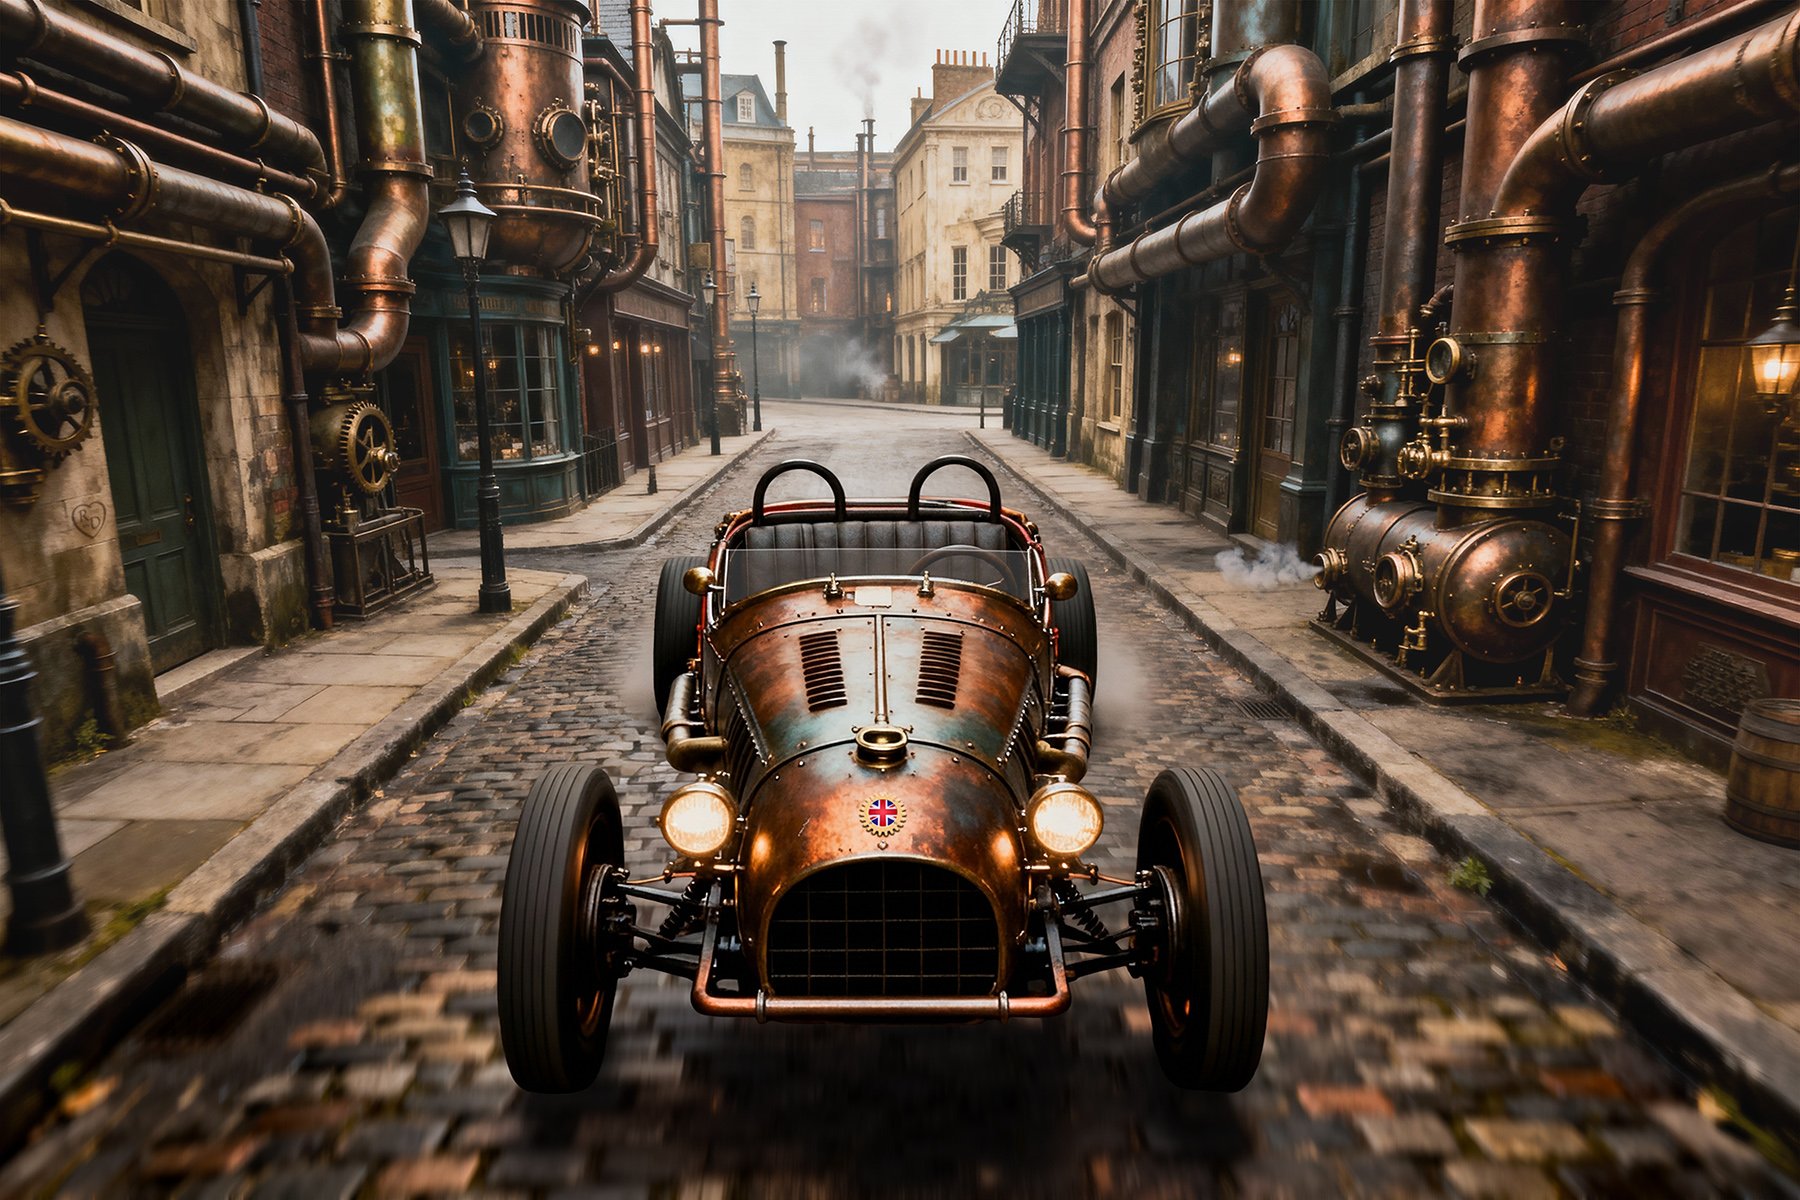
2 The backdrop for this particular composite image was created using the Seedream 4.0 AI engine ('model') which, even though not quite as hyperrealistic as the latest version, was perfect for the stylised gritty aesthetic required. Getting the desired AI output usually takes multiple attempts and involves the experienced crafting of very specific text prompts which affect different engines in different ways. In this case the prompt was not saved but it probably went something like this: "A narrow cobbled street shot on an overcast day from head height in the middle of the road. Victorian steampunk buildings adorned with big pipes line the road, which features Victorian street lighting. Dramatic cinematic film still shot on v-raptor XL with film grain. Colour-graded and post-processed with cinematic lighting. An epic atmospheric masterpiece."
3 Being familiar with artists' techniques, I opened the image in Adobe Photoshop, duplicated it twice and created masks so that I could selectively edit the background and foreground. The background layer was faded slightly to add depth, whilst the foreground was darkened and motion-blurred for a sense of speed. Any AI inaccuracies were then manually corrected e.g. a missing street-lamp was added. To enhance the atmospheric feel, I also added some steam venting from a tank on the right. Little touches like the steam bring the picture to life on a subconscious level.
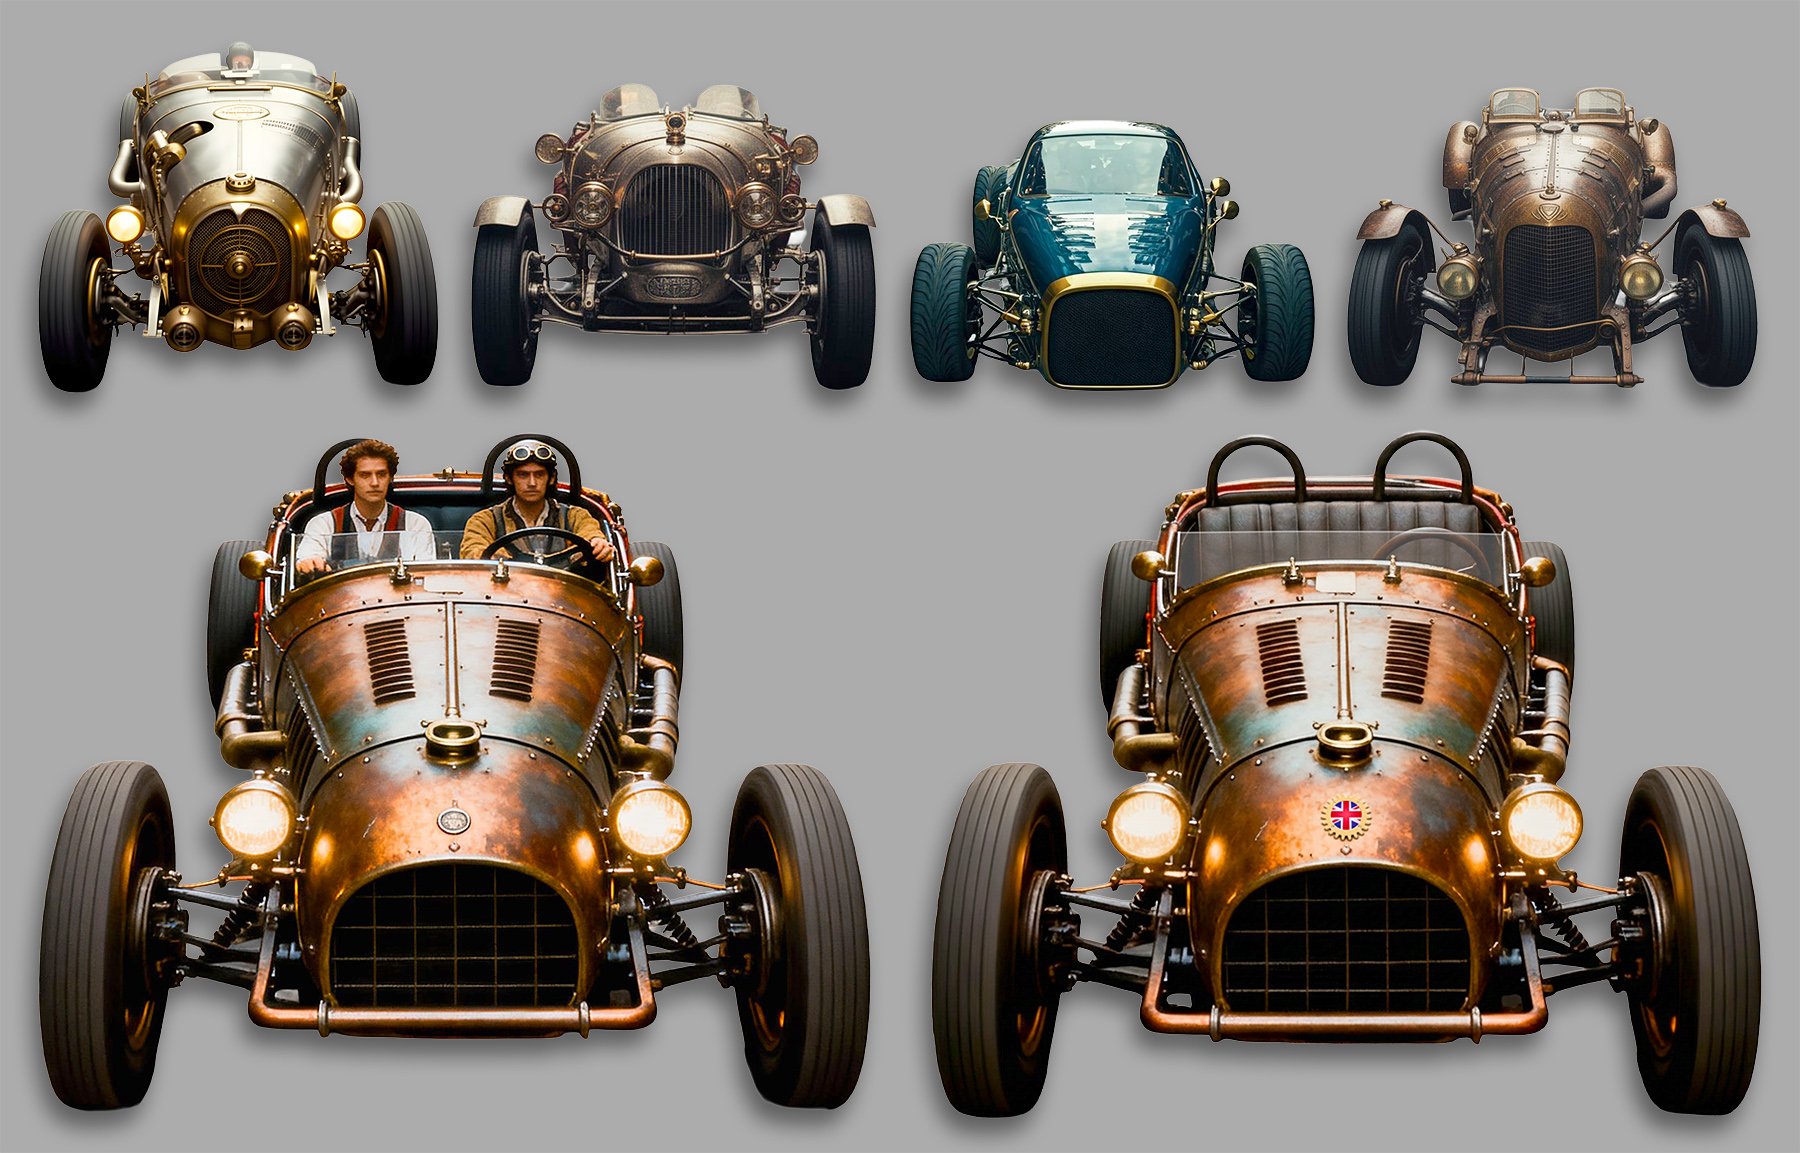
4 The same AI engine was used to create the race-car, again taking multiple attempts until the desired steampunk aesthetic, viewpoint and lighting effect were achieved (some rejected renderings from different AI engines are shown in the top row, all from the same prompt). The vehicle bottom-left of the picture was perfect but it featured incorrectly scaled and unwanted figures, so I replaced that section of the car with empty seating, then manually added a windscreen with a semi-transparent tint of white as an overlay layer so that it would eventually sit in front of the figures. I added the SteampunkHub.uk logo to the bonnet, and the vehicle was ready for the next step.
5 The race-car was set into context within the backdrop on a new layer. A photo of a Bentley Blower steering wheel was added on yet another layer, ready for the driver to grasp. Tyre smoke was added to the rear wheels to enhance the sense of action. The vehicle looked like it was floating above the road, so shadowing was added beneath the vehicle on another new layer. The advantage of keeping elements on separate layers is the ability to edit them independently at any time e.g. to darken or lighten just the car's shadow. Having the completed scene that the figures were going to be dropped into meant that I now knew the exact positioning and lighting requirements for the photographs, and could print off a visual for reference during the shoot.
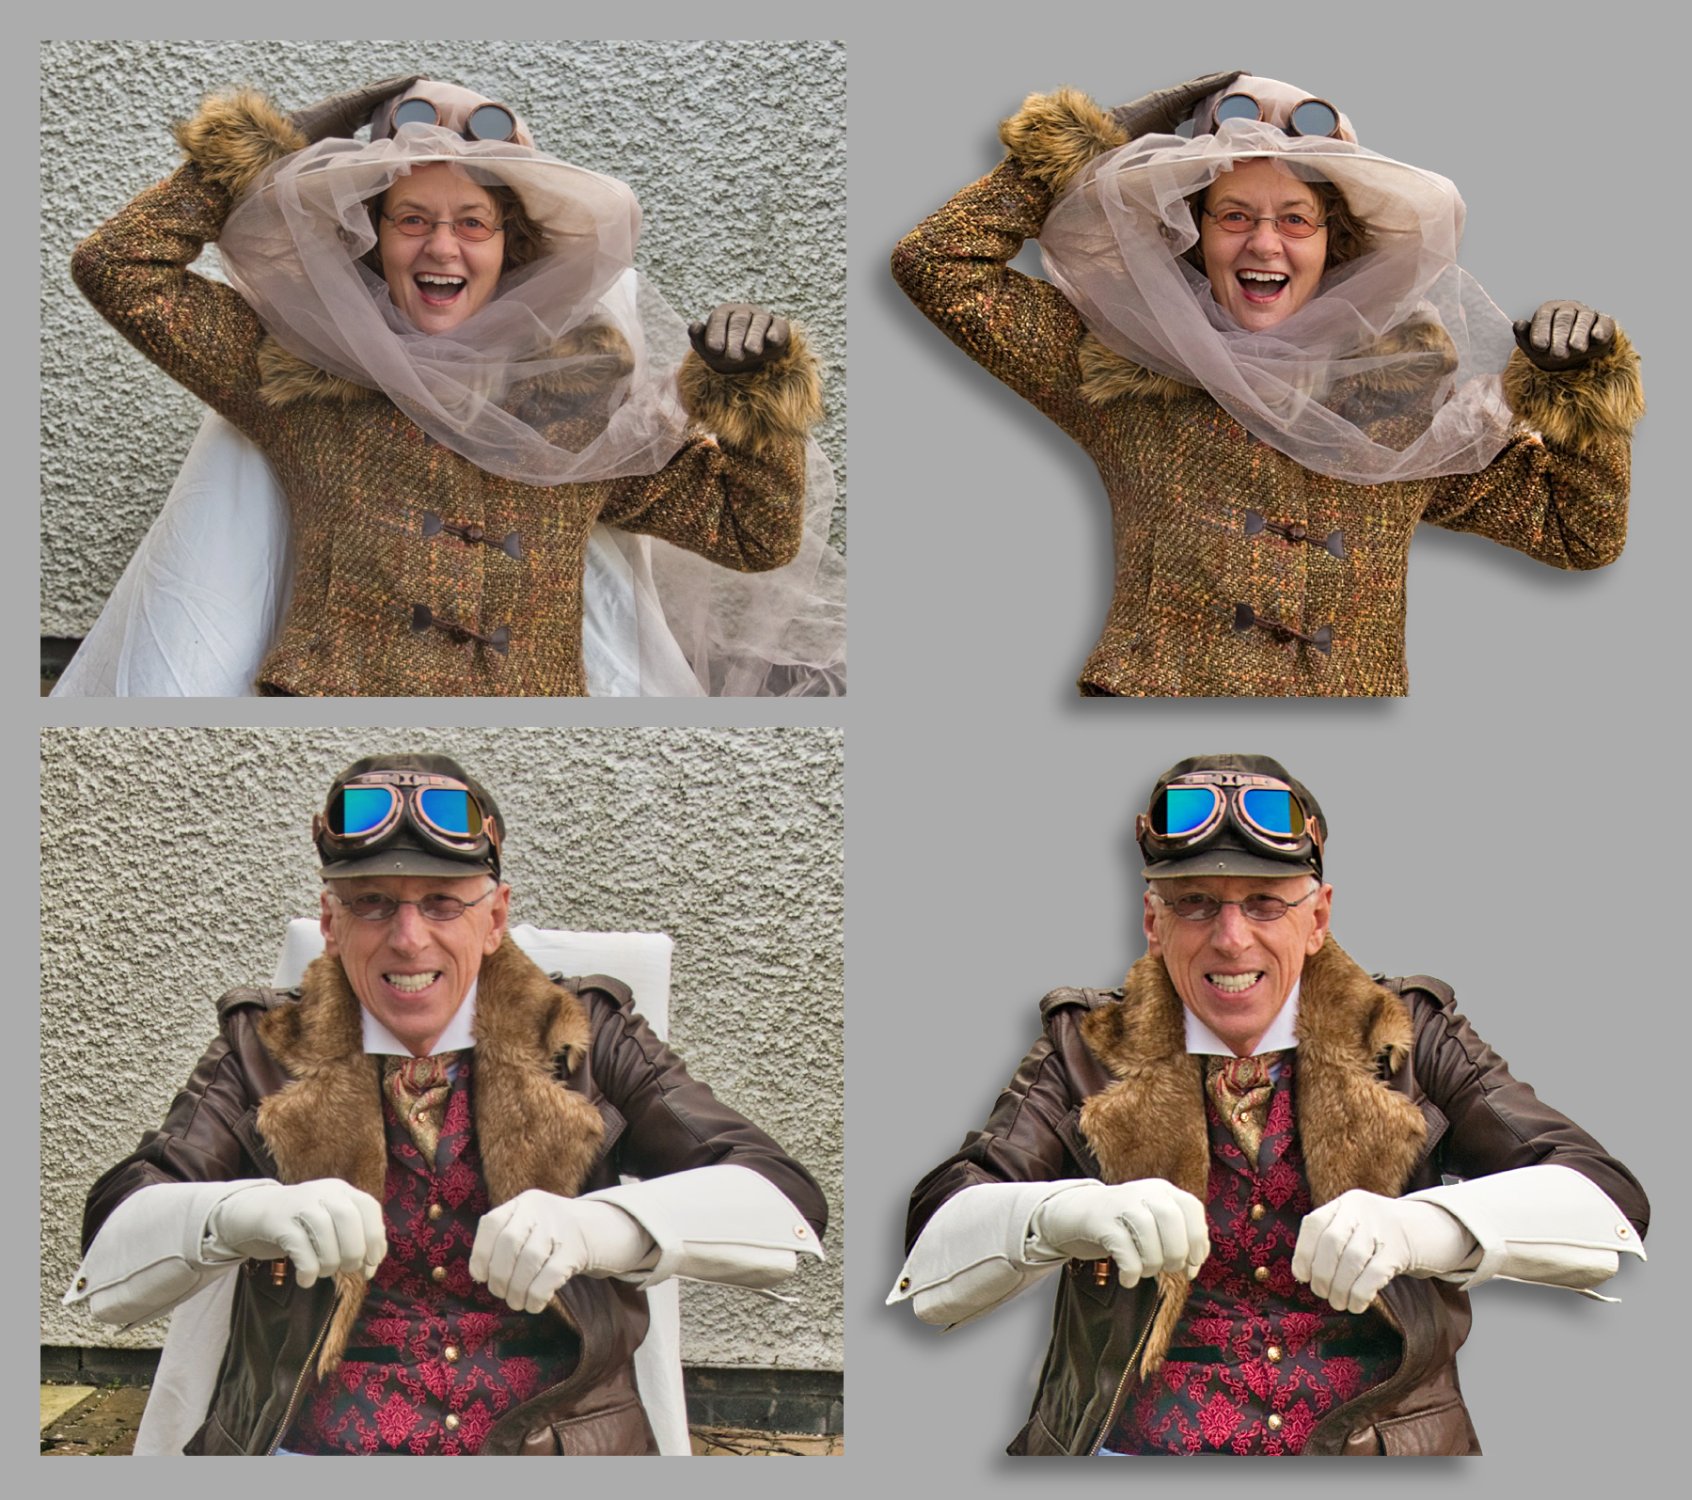
6 The driver and passenger were individually photographed dozens of times to ensure that the exact positioning and perspective were captured from the correct viewpoint, along with the exact required facial expressions. The best two photos were digitally enhanced, colour-balanced and then cut out using Photoshop. They were dropped into the main scene on new layers above the car but behind the steering wheel and windscreen. They were scaled, positioned and manually fine-tuned for lighting and colourisation. The passenger's veil was particularly troublesome as it had to be semi-transparent in different areas to different degrees to look realistic in situ.
7 The steering wheel layer (now in front of the driver) was cut out where the gloved hands would appear to grasp it. A copy of the passenger's left hand was added as a new overlay layer, and then blended into the driver's shoulder convincingly. Dozens of final tweaks and tiny edits were then carried out – including manually changing the driver's fingers to make his hands grasp the steering wheel more tightly – until I finally declared that the image matched what I had in mind when the picture was first envisioned. A quick tilt and a crop gave added dynamism to the piece, and my work was done.